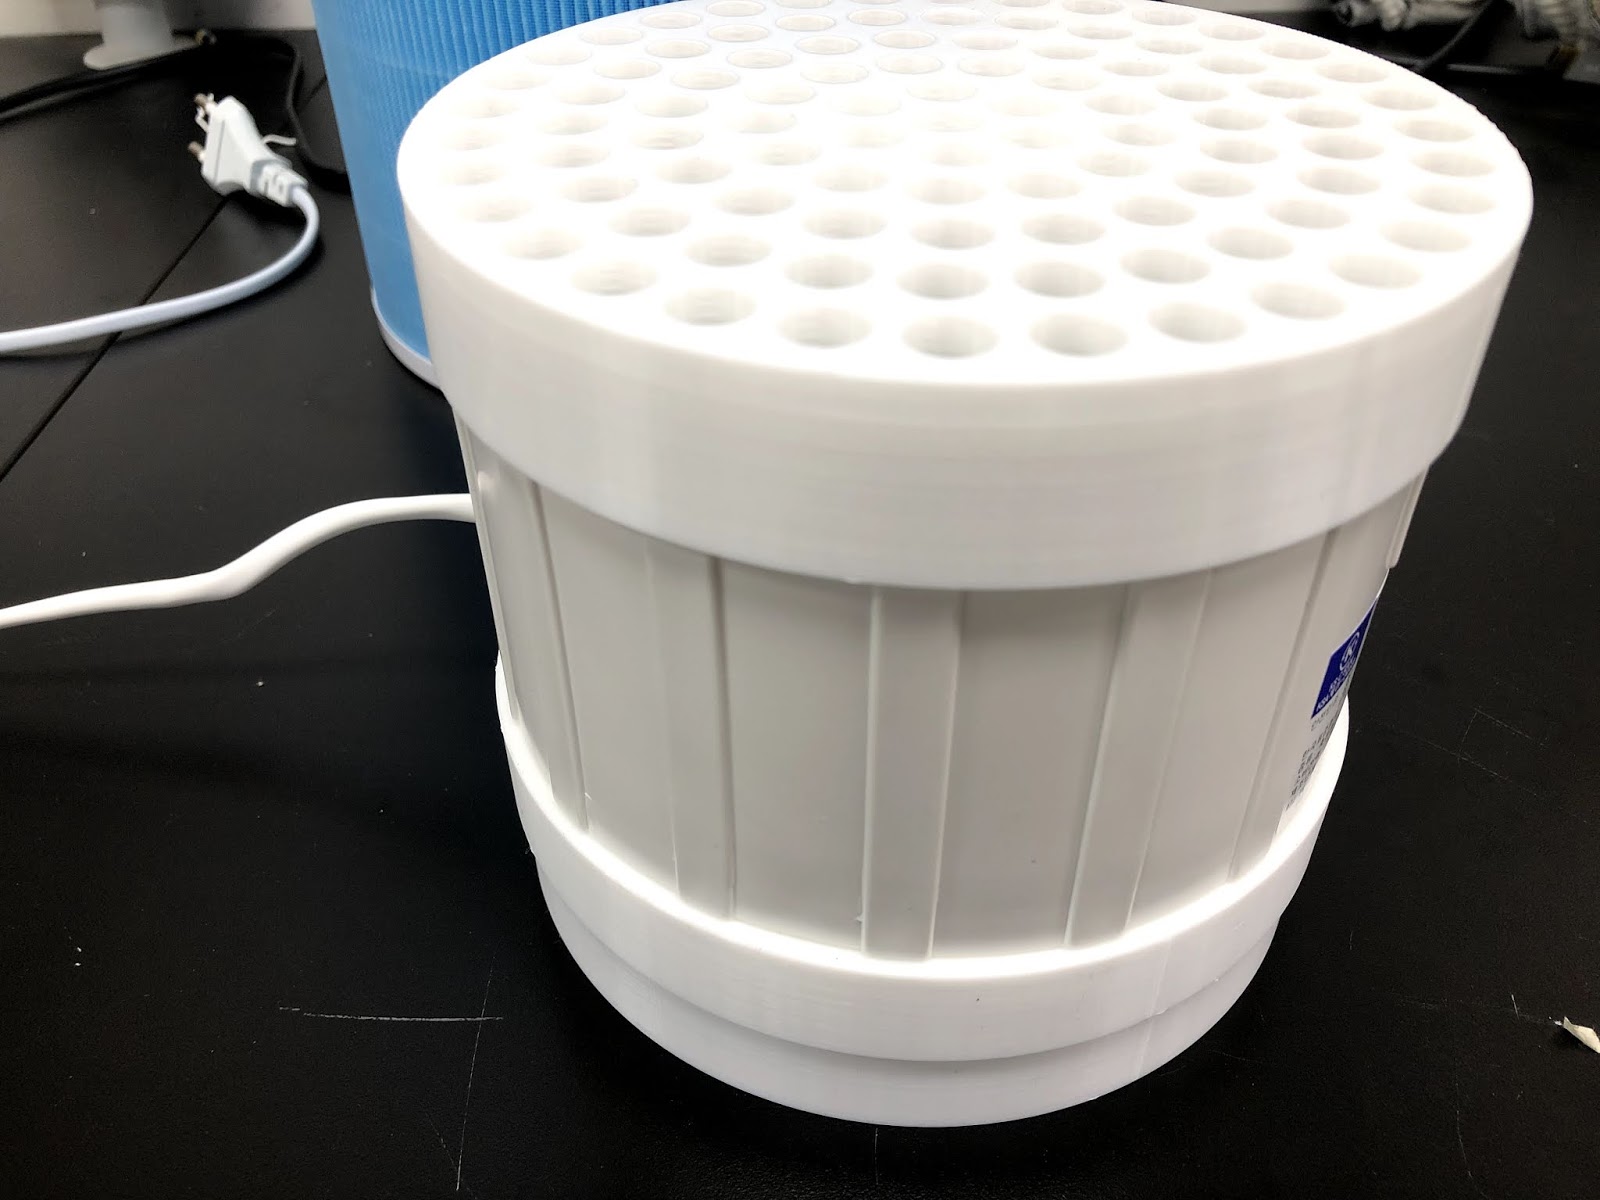
예전에 차량용 에어필터와 컴퓨터 120mm팬으로 만들었는데..
만드는데 손이 너무 많이 가서..... 많이 만들지 못했습니다.
그러다 샤오미 공기청정기 필터랑 욕실용 팬을 이용해 간단히 만든 분들을 보고 따라 만들어봤습니다. 다만, 팬과 필터의 직경이 달라 연결 부위를 디자인해 3D프린터로 출력했습니다. 팬이 바로 노출되어 있어 손이나 이물질이 들어가면 위험해 보여 팬 캡도 3D프린터로 출력했습니다.
중요한건 효과인데요.. 일단 필터 바깥쪽에 향을 피우니 향 연기가 필터 안으로 들어가는 것만 확인했습니다. 이 정도면 충분하지 않을까 조심스레 생각해봅니다. 먼지센서달고 하면 너무 손이 많이 가서... ㅎㅎ
재료(3월 15일 기준)
1. 샤오미 공기청정기 필터(호환용 클린형(블루) : 13,000원 정도 https://smartstore.naver.com/xgsoso/products/2739996372
2. 욕실용 팬 : 7,300원 https://smartstore.naver.com/rohishop/products/453639303
3. 220v 스위치 코드선 : 2,500원 http://auction.kr/iA6UN6X
4. 필터 - 팬 연결 파이프 : 3D프린팅
5. 팬 캡 : 3D프린팅
추가로 8파이 흰색 수축튜브와 절연테이프
3D프린팅한 4, 5번 제외하면 재료비가 23,000원 정도인데 각각 배송비가 모두 있습니다. 만들꺼면 여러 명이 모여 함께 만드는 걸 추천합니다. ^^
재료가 준비되면 만드는 과정은 정말 간단합니다.
팬이랑 전원선을 연결하고, 출력한 파이프로 팬과 필터 연결하고, 팬에 캡 씌워주면 끝!
MKR1000 wifi 아두이노는 wifi를 통해 웹에 접속해 웹 데이터를 불러올 수 있다. 그리고 그 웹 데이터에서 우리에게 필요한 데이터만을 잘라내 사용하면 된다. 이 과정을 파싱(parsing)이라고 한다. 파싱한 데이터를 LCD를 통해 온도, 습도와 함께 나타낸다. 시계도 표시 그러면 끝!
<미세먼지 데이터 사용을 위한 환경공단 API 키 값 받기>
환경공단에서는 개발자들을 위해 미세먼지 데이터를 활용할 수 있도록 제공하는데 이런걸 API라고 한다. 환경공단에서 데이터를 불러와 사용하려면 일단 환경공단에게 우리가 환경공단 데이터를 사용하겠다는 신고(?) 같은걸 해야한다. 그렇게 하면 api 키값을 알려준다. 이 키 값이 있어야 미세먼지 데이터에 접근해 받아올 수 있다. 돈이 들지는 않는다. 다만, 시간과 노력이 조금 필요할 뿐이다.
제일 먼저 공공데이터포털(https://www.data.go.kr) 에 접속해 회원가입을 하자. 빅데이터~ 빅데이터 그랬는데 여기에서 우리나라 공공데이터들을 제공한다. 우와~~~ ㅎㅎ
회원 가입을 하고 "미세먼지"로 데이터를 검색하면 아래쪽에 오픈 API에서 환경공단에서 제공하는 "대기오염정보 조회 서비스"를 선택한다. 그리고 설명 페이지에서 상단에 "활용 신청"을 클릭한다.
활용신청 페이지에 들어가면 이런저런 정보들을 입력하는데 시스템 유형은 "일반", 목적은 "연구", 상세기능정보는 모두 체크한 다음 신청!
그러면 마이페이지 -> 대기오염정보 서비스 -> 일반 인증키 받기를 통해 키를 받는다. 키가 아주 길다. ㅎㅎㅎ 영문자, 숫자, 특수문자가 마구마구 섞여 있다. 이 키를 복사해서 사용하면 된다.
- 전국 관측소들 (2017년 12월 기준)
작년에 교육자료를 만들면서 정리해둔 관측소들이다. 추가나 변경이 되어 있을 수 있다. 우리 동네 근처 미세먼지 관측소를 알고 싶으면 미세미세 앱을 실행해보면 아래쪽에 관측소명이 나온다. 그걸 사용하면 된다.
* 참고로 일일 트래픽이 제한되어 있다. 그래서 몇 번 테스트 하다보면 일일트래픽 제한에 걸려 막힌다. (ㅠㅠ) 트래픽 용량 추가 신청은 각자 알아서 ^^ 학교에서 활용할 경우에는 교육용으로 활용하려고 한다고 간단한 자료를 만들어 함께 신청하면 용량을 늘려준다. 친절하다.
그리고 신청하더라도 바로 서비스를 이용할 수는 없다. 하루 정도 기다려야 했다. 2017년 말 기준이다. 지금은 어떤지 잘 모르겠다. 난 이미 신청이 되어 있기때문에...
<MKR1000 wifi 접속해 웹 데이터 불러오기>
따로 회로는 필요없다. MKR1000과 wifi 공유기만 있으면 된다. 없으면 스마트폰 테더링 ^^
아두이노 IDE 예제에서 WIFI101 -> WifiWebClient 예제를 불러온다.
사용하는 WIFI의 SSID와 비밀번호를 입력하면 된다.
예제를 불러오면 arduino_secrets.h 탭이 있고 여기에 입력하면 된다.
  int i = 0;
  while (client.available()) {
    //char c = client.read();
    //Serial.write(c);
    i++;
    String line = client.readStringUntil('\n');

    int datatime= line.indexOf("</dataTime>");

    if(datatime>0){
      String tmp_str="<dataTime>";
      String wt_datatime = line.substring(line.indexOf(tmp_str)+tmp_str.length(),datatime);
      Serial.print("datetime : ");
      Serial.println(wt_datatime);
    }

    int pm10value= line.indexOf("</pm10Value>");

    if(pm10value>0){
      String tmp_str="<pm10Value>";
      String wt_pm10value = line.substring(line.indexOf(tmp_str)+tmp_str.length(),pm10value);
      Serial.print("pm10 value : ");
      Serial.println(wt_pm10value);
    }

    int pm25value= line.indexOf("</pm25Value>");

    if(pm25value>0){
      String tmp_str="<pm25Value>";
      String wt_pm25value = line.substring(line.indexOf(tmp_str)+tmp_str.length(),pm25value);
      Serial.print("pm25 value : ");
      Serial.println(wt_pm25value);
    }

  }
loop문 -> while문 위아래를 위와 같이 바꿔준다.
코드를 넣고 실행하면 시리얼 모니터에 다음과 같이 나온다.
자 이제 마지막으로 주기적으로 데이터를 불러오도록 해야한다. WifiWebClient_repeating이란 예제가 있다. 이 예제를 실행하면 아두이노 홈페이지 데이터를 잘 불러온다. 근데 에어코리아 데이터는 두 번 로딩한뒤 그 뒤로는 데이터를 가져오지 못했다..... 왜 그런지 나도 잘 모르겠다. 위에 참고한 사이트 분에게 질문을 남겨도 안그랬던거 같다.
흐음... 그래서 내가 선택한 방법은 wifi 접속도 새로 하는거다. 에어코리아 데이터 자체가 1시간을 주기로 업데이트 되기 때문에 wifi 에 계속 접속해서 데이터를 불러올 필요가 없다. 그래서 wifi 접속을 끊었다가 새로 접속하는 방법으로 실행해보니 데이터를 잘 불러온다. ㅎㅎㅎ 뭔가 꼼수같지만.. 적당히 잘 되니 그대로 사용하기로 한다.
그리고 DHT11을 붙였다. 또, 시계도 띄웠다. MKR1000에는 RTC가 내장되어 있어 별도의 RTC모듈 없이 시계로 사용할 수 있다. 미세먼지 농도에 따라 LCD 배경 색이 바뀐다.
#include <SPI.h>
#include <WiFi101.h>
#include <WiFiUdp.h>
#include <RTCZero.h>
#include "Adafruit_GFX.h"
#include "Adafruit_ILI9341.h"
#include <DHT.h>
#include <Wire.h>

RTCZero rtc;
WiFiClient client;

///////please enter your sensitive data in the Secret tab/arduino_secrets.h
char ssid[] = "wool2";        // your network SSID (name)
char pass[] = "";    // your network password (use for WPA, or use as key for WEP)
int keyIndex = 0;            // your network key Index number (needed only for WEP)

int status = WL_IDLE_STATUS;

char server[] = "openapi.airkorea.or.kr";

#define APIKEY    "wzLtVFLILOfnpEs%2BQoZ6udu8Eil%2FNLlWOP4UfsTvE%2B4DJQaZyjekaA%3D%3D"
#define CITY    "신풍동"//"신풍동"
#define VERSION    "1.3"

const int reconnect_wifi_Interval = 3; // 10 minutes
const long refresh_lcd_Interval = 20L * 1000L; // 20 seconds

const int GMT = 9; //change this to adapt it to your time zone

long count = 0;

// For MKR1000
#define TFT_MISO 10 // SDO/MISO
#define TFT_CLK 9 // SCK
#define TFT_MOSI 8 // SDI/MOSI
#define TFT_DC 7 // DC/RS
#define TFT_CS 6 // CS
#define TFT_RST 5 // RESET
//LED - vcc(3.3V)

Adafruit_ILI9341 tft = Adafruit_ILI9341(TFT_CS, TFT_DC, TFT_MOSI, TFT_CLK, TFT_RST, TFT_MISO);

#define DHTPIN 2
#define DHTTYPE DHT11
DHT dht(DHTPIN,DHTTYPE);

String tft_datatime = "";
String tft_pm10value = "";
String tft_pm25value = "";

int pm10 = 0;
int pm25 = 0;

int time_h = 0;
int time_m = 0;

void setup() {
  //Initialize serial and wait for port to open:
  Serial.begin(9600);

  // check for the presence of the shield:
  if (WiFi.status() == WL_NO_SHIELD) {
    Serial.println("WiFi shield not present");
    // don't continue:
    while (true);
  }

  rtc.begin();

  wificonnent();

  dustRequest();

  /////// tft lcd ///////////////////
  tft.begin();

  // read diagnostics (optional but can help debug problems)
  uint8_t x = tft.readcommand8(ILI9341_RDMODE);
  Serial.print("Display Power Mode: 0x"); Serial.println(x, HEX);
  x = tft.readcommand8(ILI9341_RDMADCTL);
  Serial.print("MADCTL Mode: 0x"); Serial.println(x, HEX);
  x = tft.readcommand8(ILI9341_RDPIXFMT);
  Serial.print("Pixel Format: 0x"); Serial.println(x, HEX);
  x = tft.readcommand8(ILI9341_RDIMGFMT);
  Serial.print("Image Format: 0x"); Serial.println(x, HEX);
  x = tft.readcommand8(ILI9341_RDSELFDIAG);
  Serial.print("Self Diagnostic: 0x"); Serial.println(x, HEX);

  Serial.println(F("Benchmark                Time (microseconds)"));
  delay(10);
  Serial.println(F("Screen fill              "));
  //Serial.println(testFillScreen());
  delay(500);
}

void loop() {

  time_h = rtc.getHours() + GMT;
  time_m = rtc.getMinutes();

  if(time_h >24){
    time_h = time_h - 24;
  }
  Serial.print(time_h);
  Serial.print(":");
  Serial.println(time_m);

  if(time_m % reconnect_wifi_Interval == 0) {

    wificonnent();

    dustRequest();

    delay(30000);

  }

  float h = dht.readHumidity();
  float t = dht.readTemperature();
  // Read temperature as Fahrenheit (isFahrenheit = true)
  float f = dht.readTemperature(true);

  pm10 = tft_pm10value.toInt();
  pm25 = tft_pm25value.toInt();

  if(pm10 > 100 || pm25 > 50) {
    tft.fillScreen(ILI9341_RED);
  }
  else if(pm10 > 50 || pm25 > 25) {
    tft.fillScreen(ILI9341_ORANGE);
  }
  else if(pm10 > 30 || pm25 > 15) {
    tft.fillScreen(ILI9341_GREEN);
  }
  else {
    tft.fillScreen(ILI9341_BLUE);
  }

  tft.setRotation(0); //0~3
  tft.setCursor(0, 0);
  tft.setTextColor(ILI9341_WHITE);

  tft.setTextSize(2);
  tft.println(" ");

  tft.setTextSize(8);
  if(time_h < 10) {
    tft.print("0");
  }
  tft.print(time_h);
  tft.print(":");
  if(time_m < 10) {
    tft.print("0");
  }
  tft.println(time_m);

  tft.setTextSize(2);
  tft.println(" ");

  tft.setTextSize(5);

  tft.print("H: ");
  tft.print(int(h));
  tft.println("%");
  tft.print("T: ");
  tft.print(int(t));
  tft.println("*C ");

  tft.setTextSize(2);
  tft.println(" ");

  tft.setTextSize(4);
  tft.print("pm10:");
  tft.println(pm10);
  tft.print("pm2.5:");
  tft.println(pm25);

  tft.setTextSize(1);
  tft.print("update: ");
  tft.println(tft_datatime);

  tft.print("refresh count: ");
  tft.println(count);
  tft.print(" made by wool");

  //end and disconnect wifi
  client.stop();
  WiFi.end();

  status = WiFi.status();

  delay(refresh_lcd_Interval);

  Serial.println("--------------------------------------");

}

void wificonnent() {

  // attempt to connect to WiFi network:
  while ( status != WL_CONNECTED) {
    Serial.print("Attempting to connect to SSID: ");
    Serial.println(ssid);
    // Connect to WPA/WPA2 network. Change this line if using open or WEP network:
    status = WiFi.begin(ssid, pass);

    // wait 10 seconds for connection:
    delay(10000);
  }
  // you're connected now, so print out the status:
  printWiFiStatus();

  get_time();

}


// this method makes a HTTP connection to the server:
void dustRequest() {
  // close any connection before send a new request.
  // This will free the socket on the WiFi shield
  client.stop();

  // if there's a successful connection:
  if (client.connect(server, 80)) {
    Serial.println("connecting...");
    // send the HTTP PUT request:
    client.print(F("GET /openapi/services/rest/ArpltnInforInqireSvc/getMsrstnAcctoRltmMesureDnsty?stationName="));
    client.print(CITY);
    client.print(F("&dataTerm=daily&pageNo=1&numOfRows=1&ServiceKey="));
    client.print(APIKEY);
    client.print(F("&ver="));
    client.print(VERSION);
    client.print(F(" HTTP/1.1\r\n"));
    client.println("Host: openapi.airkorea.or.kr");
    client.println("Connection: close");
    client.println();

    // note the time that the connection was made:
    //lastConnectionTime = millis();
  }
  else {
    // if you couldn't make a connection:
    Serial.println("connection failed");
  }

  while(!client.available()) {
  }

  int i = 0;
  while (client.available()) {
    i++;
    String line = client.readStringUntil('\n');

    int datatime= line.indexOf("</dataTime>");

    if(datatime>0){
      Serial.println("-----------------------------");
      String tmp_str="<dataTime>";
      String wt_datatime = line.substring(line.indexOf(tmp_str)+tmp_str.length(),datatime);
      Serial.print("datetime : ");
      Serial.println(wt_datatime);
      tft_datatime = wt_datatime;
    }

    int pm10value= line.indexOf("</pm10Value>");

    if(pm10value>0){
      String tmp_str="<pm10Value>";
      String wt_pm10value = line.substring(line.indexOf(tmp_str)+tmp_str.length(),pm10value);
      Serial.print("pm10 value : ");
      Serial.println(wt_pm10value);
      tft_pm10value = wt_pm10value;
    }

    int pm25value= line.indexOf("</pm25Value>");

    if(pm25value>0){
      String tmp_str="<pm25Value>";
      String wt_pm25value = line.substring(line.indexOf(tmp_str)+tmp_str.length(),pm25value);
      Serial.print("pm25 value : ");
      Serial.println(wt_pm25value);
      count++;
      Serial.println(count);
      tft_pm25value = wt_pm25value;
    }

  }
}

void printWiFiStatus() {
  // print the SSID of the network you're attached to:
  Serial.print("SSID: ");
  Serial.println(WiFi.SSID());

  // print your WiFi shield's IP address:
  IPAddress ip = WiFi.localIP();
  Serial.print("IP Address: ");
  Serial.println(ip);

  // print the received signal strength:
  long rssi = WiFi.RSSI();
  Serial.print("signal strength (RSSI):");
  Serial.print(rssi);
  Serial.println(" dBm");
}

void get_time() {

  unsigned long epoch;
  int numberOfTries = 0, maxTries = 6;
  do {
    epoch = WiFi.getTime();
    numberOfTries++;
  }
  while ((epoch == 0) && (numberOfTries < maxTries));

  if (numberOfTries > maxTries) {
    Serial.print("NTP unreachable!!");
    while (1);
  }
  else {
    Serial.print("Epoch received: ");
    Serial.println(epoch);
    rtc.setEpoch(epoch);

    Serial.println();
  }
}