알리익스프레스에서 아주 저렴하게 구매할 수 있다.
완제품이 더 깔끔하고 예쁠 수 있지만... ^^
하나씩 만들가는 재미가 있기에


달 모형은 씽기버스에 올라온 것을 그대로 사용하고, 아래 조명 스탠드만 디자인하고 제작했다.
달 모형 : https://www.thingiverse.com/thing:2531838
달 모형 : https://www.thingiverse.com/thing:2531838
스탠드 3D STL, 회로도, 아두이노 소스코드(GitHub) : http://bit.ly/2PRnl5d
씽기버스 : https://www.thingiverse.com/thing:3110415

씽기버스 : https://www.thingiverse.com/thing:3110415

재료

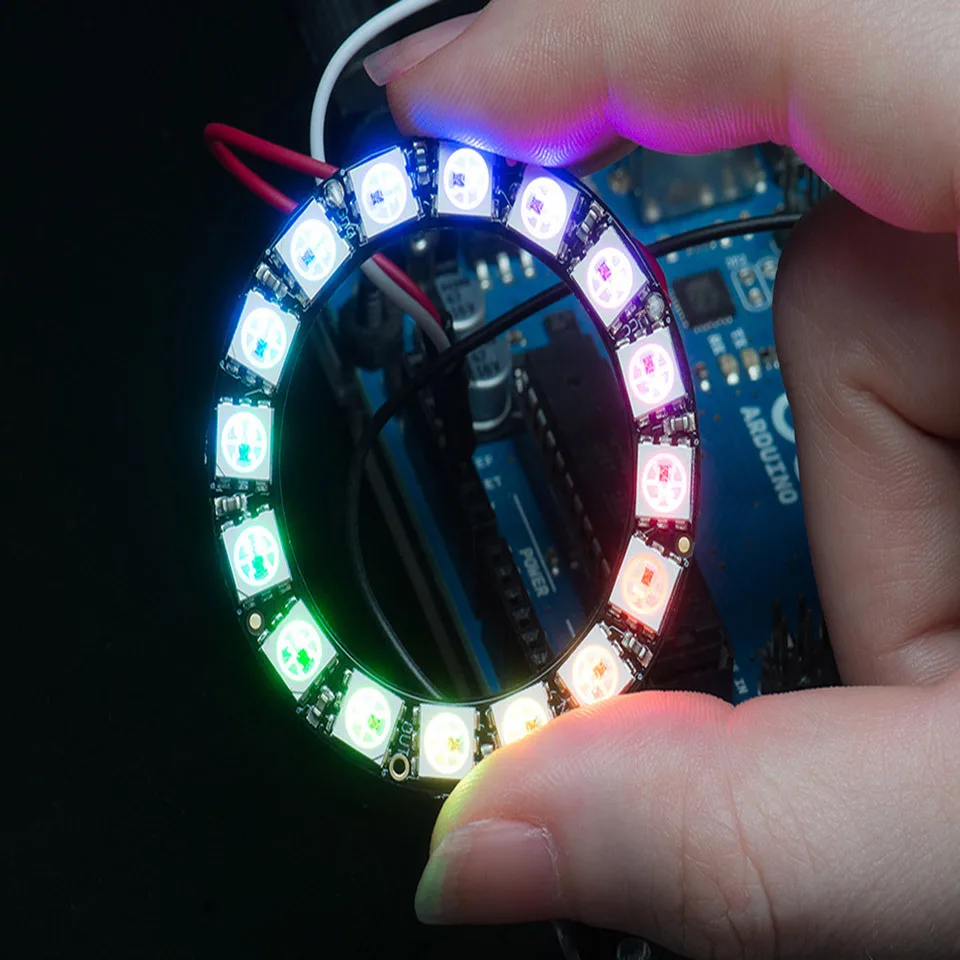
- neopixel 16 ring : http://bit.ly/2NXujsf

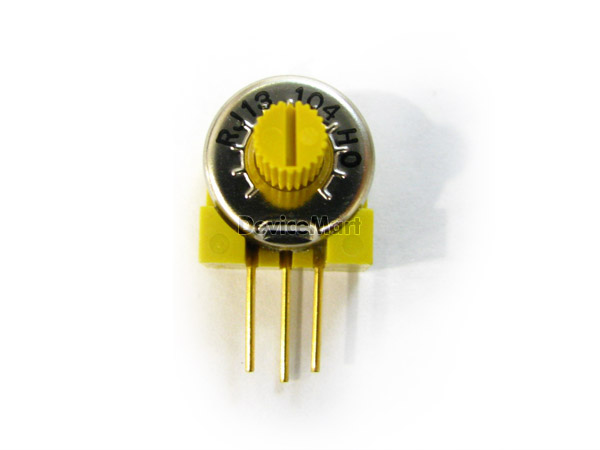
- 10k ohm 가변저항(potentiometer) : http://bit.ly/2PP9koI or http://bit.ly/2Nsy6OQ or http://bit.ly/2NoL5kH
Neopixel ring을 이용해 다양한 색을 낼 수 있도록 하고,
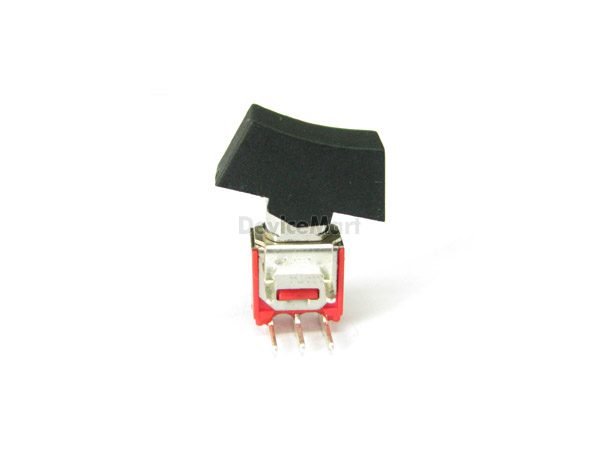
푸쉬스위치로 색을 변경할 수 있도록 했다.
가변저항으로 빛의 밝기를 조절할 수 있도록 하고
토글스위치로 조명을 켜고 끌 수 있도록 회로를 만들었다.
사실 usb 전원을 따로 달아서 아두이노까지 켜지고 꺼지도록 할 수 있게 하려하다 괜히 더 복잡해지기만 해서
LED만 켜지고 꺼지도록 했다. 그래서 토글스위치로 LED를 꺼도 아두이노 회로 전체가 꺼지는 것은 아니다.


아두이노 5V - toggle 스위치 - 가변저항 - ring vcc
아두이노 GND - push 스위치 - 가변저항 - ring GND
아두이노 D3 - push 스위치
아두이노 D5 - ring data in
아두이노 A0 - 가변저항
으로 연결했다. 결국 토글스위치로 네오픽셀 ring의 VCC 전원을 켜거나 끌 뿐이다.
아두이노 스케치 코드
코드에서 푸쉬스위치를 누르면 컬러 모드(c_mode)를 변경한다.
LED 밝기는 가변저항 값을 읽는데, 아두이노는 0~1024로 읽는다. 근데, 그 값이 일정하지 않다. 조금씩 계속 변한다. 그래서 작은 변화는 무시하기 위해 100으로 나누고 소수점 이하는 버린다. 그러면 아날로그로 읽은 값이 100이상 변하지 않는 이상 작은 변화들은 모두 버리게 된다. neopixel의 밝기는 0~255 단계이므로 map 함수로 0~12를 0~255로 벌려준다.
아두이노 GND - push 스위치 - 가변저항 - ring GND
아두이노 D3 - push 스위치
아두이노 D5 - ring data in
아두이노 A0 - 가변저항
으로 연결했다. 결국 토글스위치로 네오픽셀 ring의 VCC 전원을 켜거나 끌 뿐이다.
아두이노 스케치 코드
#include <Adafruit_NeoPixel.h>
#ifdef __AVR__
  #include <avr/power.h>
#endif

int led_PIN = 5;
int button_PIN = 3;
int poten_PIN = A0;

int b_value = 0; //brightness
int led_brgiht = 0;
int c_mode = 0; //color mode

Adafruit_NeoPixel strip = Adafruit_NeoPixel(16,  led_PIN, NEO_GRB + NEO_KHZ800);


void setup() {
  #if defined (__AVR_ATtiny85__)
    if (F_CPU == 16000000) clock_prescale_set(clock_div_1);
  #endif
  Serial.begin(9600);
  pinMode(button_PIN, INPUT_PULLUP);
  strip.begin();
  strip.show(); // Initialize all pixels to 'off'
}

void loop() {

  //read potentialmeter value and convert proper led brgihtness
  int b_temp;

  //b_temp = (int)(analogRead(A0)/100);
  b_temp = 1024;
  Serial.println(b_temp);

  if(b_value != b_temp){
    b_value = b_temp;
  }

  led_brgiht = map(b_value, 0, 12, 0, 255);

  //change color mode
  int sensorVal = digitalRead(button_PIN);

  // pull-up pushbutton
  // HIGH when it's open, and LOW when it's pressed
  if (sensorVal == HIGH) {
    c_mode = c_mode + 1;
    if(c_mode == 5) {
      c_mode = 0;
    }
    delay(500);
  }

  //Serial.println(c_mode);
  //white
  if( c_mode == 0 ) {
    colorWipe(strip.Color(led_brgiht, led_brgiht, led_brgiht), 5);
  }
  //yellow
  else if( c_mode == 1 ) {
    colorWipe(strip.Color(led_brgiht, led_brgiht, 0), 5);
  }
  //red
  else if( c_mode == 2 ) {
    colorWipe(strip.Color(led_brgiht, 0, 0), 5);
  }
  else if( c_mode == 3 ) {
    rainbow(100);
  }
  else if( c_mode == 4 ) {
    theaterChaseRainbow(50);
  }


  // Send a theater pixel chase in...
  //theaterChase(strip.Color(127, 127, 127), 50); // White
  //theaterChase(strip.Color(127, 0, 0), 50); // Red
  //theaterChase(strip.Color(0, 0, 127), 50); // Blue

  //rainbow(20);
  //rainbowCycle(20);
  //theaterChaseRainbow(50);
}

// Fill the dots one after the other with a color
void colorWipe(uint32_t c, uint8_t wait) {
  for(uint16_t i=0; i<strip.numPixels(); i++) {
    strip.setPixelColor(i, c);
    strip.show();
    delay(wait);
  }
}

void rainbow(uint8_t wait) {
  uint16_t i, j;

  for(j=0; j<256; j++) {
    for(i=0; i<strip.numPixels(); i++) {
      strip.setPixelColor(i, Wheel((i+j) & 255));
    }
    strip.show();
    delay(wait);
  }
}

// Slightly different, this makes the rainbow equally distributed throughout
void rainbowCycle(uint8_t wait) {
  uint16_t i, j;

  for(j=0; j<256*5; j++) { // 5 cycles of all colors on wheel
    for(i=0; i< strip.numPixels(); i++) {
      strip.setPixelColor(i, Wheel(((i * 256 / strip.numPixels()) + j) & 255));
    }
    strip.show();
    delay(wait);
  }
}

//Theatre-style crawling lights.
void theaterChase(uint32_t c, uint8_t wait) {
  for (int j=0; j<10; j++) {  //do 10 cycles of chasing
    for (int q=0; q < 3; q++) {
      for (uint16_t i=0; i < strip.numPixels(); i=i+3) {
        strip.setPixelColor(i+q, c);    //turn every third pixel on
      }
      strip.show();

      delay(wait);

      for (uint16_t i=0; i < strip.numPixels(); i=i+3) {
        strip.setPixelColor(i+q, 0);        //turn every third pixel off
      }
    }
  }
}

//Theatre-style crawling lights with rainbow effect
void theaterChaseRainbow(uint8_t wait) {
  for (int j=0; j < 256; j++) {     // cycle all 256 colors in the wheel
    for (int q=0; q < 3; q++) {
      for (uint16_t i=0; i < strip.numPixels(); i=i+3) {
        strip.setPixelColor(i+q, Wheel( (i+j) % 255));    //turn every third pixel on
      }
      strip.show();

      delay(wait);

      for (uint16_t i=0; i < strip.numPixels(); i=i+3) {
        strip.setPixelColor(i+q, 0);        //turn every third pixel off
      }
    }
  }
}

// Input a value 0 to 255 to get a color value.
// The colours are a transition r - g - b - back to r.
uint32_t Wheel(byte WheelPos) {
  WheelPos = 255 - WheelPos;
  if(WheelPos < 85) {
    return strip.Color(255 - WheelPos * 3, 0, WheelPos * 3);
  }
  if(WheelPos < 170) {
    WheelPos -= 85;
    return strip.Color(0, WheelPos * 3, 255 - WheelPos * 3);
  }
  WheelPos -= 170;
  return strip.Color(WheelPos * 3, 255 - WheelPos * 3, 0);
}
코드에서 푸쉬스위치를 누르면 컬러 모드(c_mode)를 변경한다.
LED 밝기는 가변저항 값을 읽는데, 아두이노는 0~1024로 읽는다. 근데, 그 값이 일정하지 않다. 조금씩 계속 변한다. 그래서 작은 변화는 무시하기 위해 100으로 나누고 소수점 이하는 버린다. 그러면 아날로그로 읽은 값이 100이상 변하지 않는 이상 작은 변화들은 모두 버리게 된다. neopixel의 밝기는 0~255 단계이므로 map 함수로 0~12를 0~255로 벌려준다.
댓글 없음:
댓글 쓰기